Sep 24, 2024
THREE TREES OF CHRISTMAS CROCHET PILLOW PATTERN
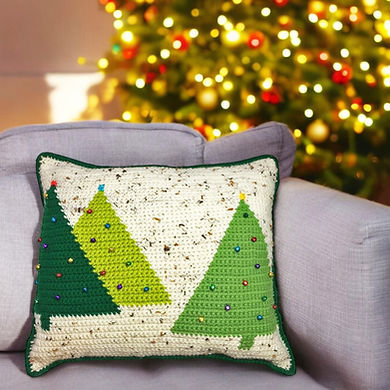
Introducing the Three Trees of Christmas Pillow Pattern - a festive addition to your holiday decor! This easy to follow pattern creates a pillow cover featuring three textured Christmas trees, each crocheted in different shades of green for added depth and charm. Customize your design with optional embellishments like little jingle bells or beads for extra holiday flair. Perfect for sprucing up your home or gifting a handmade treasure, this pattern is a timeless seasonal accent you'll enjoy making year after year!


TOOLS/MATERIALS
US H/8 - 5.0mm crochet hook
darning needle
18" x 18" pillow insert
medium (4) acrylic yarn - 4 colors
PILLOW MEASUREMENT
17" X 17"
SKILL LEVEL
Beginner
I have put together a quick You Tube tutorial to show you what you need to know to complete this project.
PATTERN NOTES:
The pattern begins after creating a foundation chain of 70 stitches, followed by an additional chain at the end of the row. Work the pattern from right to left, starting with the right side. The shaded horizontal lines indicate stitches worked in the right-to-left direction (front/right side), while the plain white horizontal lines represent stitches worked from left to right (back/wrong side).
Each square corresponds to one single crochet stitch. Pay attention to your stitch count — I've included the stitch counts in the pattern to help you keep track without needing to count each square.
CHART PATTERN

Working with multiple yarn colors, especially when using four different colors, is all about maintaining order and stating organized. As you switch between colors, it’s crucial to keep the yarn untangled by consistently placing each color in the same spot or following a specific sequence. This helps prevent knots and confusion as you work through the pattern. Keeping the colors in order not only makes the process smoother but keeps your sanity in intact.

let's add the joyful details
Once you're done with the panel, let's add some stars on top of the trees using yarn from your stash that you have lying around. You’ll only need about 15" to 20" of bright- colored yarn for each star. Using a darning needle, simply sew in the stars with criss-cross stitches at the top of each tree. This adds a fun, festive touch to your design, giving the trees a little extra holiday sparkle. Plus, it's a great way to use up those small bits of leftover yarn!


To add a festive touch to our trees, I recommend using these adorable little jingle bells. For this project, I find it best to use a needle with a thinner thread, as the tapestry needle to too large to fit through the bells. You can find a variety of bells on Amazon, typically available in bulk for around $6-$8, or grab a small bag at Michaels. Simple sew them on randomly across the trees; not only with this enhance the pillow’s charm, but it will also create a delightful jingling sound!


For the back side of the pillow, I prefer to create a contrasting design, making it reversible and giving it a fresh look. In this case, I’ve chosen the Caron One Pound Kelly Green, maintaining the same foundation count of 70 stitches. Any of the three green yarn would work beautifully for the back. Simply crochet the two panels together using a single crochet stitch all around, sealing it up after inserting the pillow for a polished finish.
You’re welcome to use this pattern for your own crochet creations, whether for gifts or for sale, just please include an attribution link to Anna B. Crochet when posting online. However, please do not resell or distribute the pattern in any form. If you make this pillow, I’d love to see it! Tag me on Pinterest (@annaburtondesigns) or Instagram (@annabcrochet) so I can check out your work.

